Tuesday, September 28, 2010

Shade Shirt Wanna-Be

I have several favorite shirts.  And as I have explained in previous posts--If I find something I like--I usually buy SEVERAL of them--just in different colors.  So if you were to parooze (sp?) my closet--you would find little variety in styles--but a little more variety in colors.  (I know--I'm lame that way!) 

Anyhoo, So my very FAVORITE T-shirts (and yes I have 3 of them) are made by SHADE CLOTHING.  (Love those guys!)  And they look like this:


 I have had the shirts for several years--and I was JUST about to order some more when I found out that SHADE IS GOING OUT OF BUSINESS!!!  (Sob!)  So I quickly went online to see if I could order anything before they closed up shop ONLY TO FIND EVERYTHING WAS SOLD OUT IN MY SIZE!!!!  BUMMER!!!

And I have worn the shirts so much that some of them are doing this:

See how the neck line is getting all stretchy and bubbly?  The elasticity in the Spandex is dieing and it is making the shirt look all funny!

 I HAVE to retire these shirts--but I need a replacement--and I can no longer buy one!!  Wah!!

So what is a girl to do? 

I guess I just have to try and MAKE ONE.
I remembered that I had some stretchy knit fabric in my stash that was exactly like the fabric for these shirts.  So I got out the fabric and got out my favorite shirt.

I laid the fabric down first on the fold--then I folded my shirt in half as well and laid it on top of my fabric.

(Now SORRY--I don't have many pictures of what I did--as I was in the ZONE and wanted to get the project done before little people started waking up from their naps--and I didn't know if it would turn out anyway--so I figured I would just sew it up--and if it worked I would HAVE to do it again sometime and THEN I would take some more pictures! )

Next I cut around my shirt back leaving about 5/8" seam allowance.

Then I refolded the remaining fabric and folded the shirt again so that I could do the same thing and cut out the shirt front.

Then I matched shoulder seams and side seams and sewed it up.

Then I finished off the sleeves and the neckline by cutting a 3/4" strip of fabric and folding it in half.  Then I sandwiched the edge of the neckline/sleeves in between the strip of fabric and sewed it in place. 

And that was how I made this:


Ok--So the only modification I made to the shirt from the original Shade Shirt was the sleeves.  They stuck out a little funny after I added the trim around the edges--so I quickly added a little tuck/pleaty thingy on the edge. 


 I just gathered up the fabric and hand tacked it in place. 


Oh--and I used a double needle to hem the bottom of the shirt.  It gives it a nice professional looking edge.
(I may try this on the sleeves as well next time.)


Here is my crazy psycho picture taking face.  I added this for your viewing pleasure and amusement.  You may laugh at my face--but please ignore the crazy hair and no makeup!  It was a work day--what can I say?


And after it is all said and done--I LOVE THE SHIRT!!  It fits JUST LIKE THE SHADE SHIRT!!  It was SO MUCH EASIER than I thought it would be.  I am super happy with how it turned out!  And now I have to go shopping to buy more fabric to make some more!!
(Next time I will take more pictures--I promise!)

Linking up to THESE parties.

Monday, September 27, 2010

SAMM Link Up--Feel Good Chicken Casserole

Today I am really excited about linking up to my sisters new link up party--SAMM (Share A Meal Mondays)!

So here is my entry.  Nothing Fancy.  Nothing Special.  Just some Wholesome--Yummy COMFORT FOOD.

I got this recipe from my Mother in Law.  And it has become my favorite FEEL GOOD recipe.  It is the one I always take to someone after they have had a baby--or someone who is sick.  It is CHEAP, EASY, AND YUMMY!

So here it is:

Feel Good Chicken Casserole
4 cups cooked rice
1-2 cups cooked chicken cut into pieces
1 can cream soup (I use CHICKEN--but if you want to use CREAM OF FUNGUS--go ahead)
1 cup milk
1 cup grated cheese
1 small onion chopped (or if you are like me and HATE chopping raw onion--you can throw in a handful of onion flakes)
3 eggs beaten
1/4 c butter
Salt and Pepper to taste

Turn rice into a bowl.  Add all the ingredients and mix together.  Pour into a greased casserole dish and bake at 350 for 1 hour or until set and browned on top. 

It really doesn't sound like much--but I hardly ever have ANY leftovers--and I always get asked for the recipe!  Giver a try and let me know what you think!


Friday, September 24, 2010

Picture Frame Menu Board & Linky Party

The other day I saw THIS awesome idea for a Wipe Off Menu Board over at Little Birdie Secrets.  Immediately I knew that I HAD to make one for myself...as my menu planning has gone out the window as of late (who am I kidding--as of FOREVER)--and I am rushing around at 4:45 wondering what we are going to have for dinner at 5:30!!

I figure having a cute place to write out and plan my meals will keep me motivated to actually MAKE THEM!!

So this is what I did.

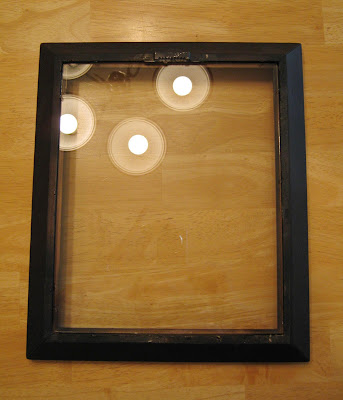
I stole this picture frame from another project I was going to use it for.  I got it from a thrift store a while ago and spray painted it with my Oil Rubbed Bronze--it originally was yellow--to better match my decor in my kitchen.

(This is the back of it--I don't know why I took a picture of the back and not the front--but you get the picture!)

Next I decided I wanted to use some this fabric that I have had FOREVER and never had a place to use it.

So I used the back of the picture to trace around the fabric and cut out a piece the right size.


Then I used this awesome stuff to spray the back of the fabric to make it stick to the back part of the frame:


Then I put the frame all back together to make this:


Which I thought was super cute--but when I went to write on it--I couldn't see the words very well because the background picture was standing out too much.

SO I PULLED THE WHOLE THING APART AND STARTED OVER!
(Which REALLY wasn't a big deal cause this whole project can be done in like 2 minutes ANYWAYS!!)

I went searching through my craft paper and found this:


So once again--I cut it out to the right size:


Reassembled the picture frame and then tried writing on this baby.


After trying out some DRY ERASE markers--and having a HUGE FLAKY MESS when I erased the board...I settled on these WET ERASE markers:


They didn't leave a flaky mess AND I didn't accidentally erase anything if I bumped up against it.
SO that made these guys the winners!

I love this project--because even though I didn't like the first background fabric--it took me almost NO TIME at all to change it out!!  So You can easily mix and match the background to change with your decor or with the seasons!!

And not only can it be an awesome MENU board--but it can also be a cute little MESSAGE board:


But for me--Since I need it to function as the Menu Planner...this is what mine will be looking like:


And I even found the PERFECT spot for it.


Don't you just love when the camera comes out--and the kids just HAVE to get in the picture somehow?
I took this picture and then noticed the little toy and cute little hand SNEAKING into the picture.


It was so cute that I took another one!  Sneaky boy!


So--Unbeknownst to me--while I was making this Menu Board, my SISTER, Michelle, was coming up with a FABULOUS idea about Menu Planning: 
She is going to be hosting a LINKY PARTY called--SAMM (SHARE A MEAL MONDAY)!  (Isn't she a genius?)

Each week everyone is going to link up a favorite recipe to share!  This is JUST WHAT I NEED to spice up my menu!  (Did you get a look at what my menu consisted of?  I NEED HELP Ladies!!)

So spread the word--and get your awesome recipes ready to Link Up!

And then go make yourself a cute little Menu Board to put all those new recipes on!!

Tuesday, September 21, 2010

To Bow Tie or Not to Bow Tie?

I have a thing for sewing my 3 boys ties.  I love when they wear their matching ties to church--and they look all matching and handsome.  And I love knowing that I spent pennies making their ties instead of buying them for big bucks.  If you haven't seen my posts about my boys ties before--you can find them HERE and HERE.  And here is a picture of my boys in their ties--just cause I LOVE THEM!


But up until now--I have always made the traditional long ties.  I have been playing with the idea of making a bow tie for a while.  But to be honest--sometimes I think bow ties can come off a little GEEKY.  It takes a special kind of guy that can pull off wearing a bow tie.  Don't you think? 
Am I the only one that feels that way? 

So I have been contemplating this issue and watching my boys to see if they could pull one off. 

And I decided that my middle guy--Landon:


...may just be a BOW TIE WEARER.

So I decided to make him one--in ORANGE (his favorite color).

I found a great tutorial HERE from the blog "A Lemon Squeezy Home" (don't you just LOVE the name of her blog?).

Her tutorial is great--so if you want to know how I made it--or if you want to make one yourself--go check out HER tutorial.  But I did change the measurements for my little guy--as her tie looked like it was for a little bit older boys.  So I will give you the measurements I used (I estimate the size of my tie would be 1-5 years and hers 5-10?).

This is what you will need:


2 pieces of fabric 2 1/2" x 8" (For the bow part of the tie)
1 piece of 2 1/2" x 8"  fusible interfacing
1 piece of fabric 2 x 3 1/4" for the little piece that wraps around the bow
1 piece of fabric 2 1/2" x 14" for the neck strap
2" velcro

**Note that in her tutorial she makes the ties PUFFY using fleece.  I didn't want a puffy look so I used one piece of fusible web interfacing and ironed it to one side of one of the bow tie pieces--and then followed the rest of the tutorial.

It was SUPER EASY to sew up. 

And THIS little boy couldn't be happier with his NEW BOW TIE.


Oh yah!!  This boy can pull off a BOW TIE!!

Linking to THESE parties.

And this one too:

Friday, September 17, 2010

Little Lady Leg Warmers

As I have mentioned before--I have a little lady that LOVES to wear dresses and skirts ALL THE TIME!!! 

So as we are heading into the fall and winter months--we usually start shopping for tights for her to wear.  But then I remembered seeing these leg warmers made from ladies knee socks--and decided to make some for my little gal so her little legs will stay warm and cozy this winter.


So I started with a pair of long socks.  I found these ones discounted at Fred Meyer--they were around $2  and I thought the little ruffle would be fun on the bottom of the leg warmers.


Next I made three cuts.  I cut the sock right before and after the heel and then cut off the toe.


Next I used the middle part left over from the foot of the sock and folded it WRONG SIDES together to make a cuff.  Then I tucked in the cut edge of the long part of the sock inside the cuff matching all three of the cut edges.  So it looked like this:


Then I sewed around the edge. 


 I used a zig zag stitch on this pair--but on others I used a regular stitch and both work great.


 I did the same thing to the other sock and in about 10 minutes from start to finish--My little lady had a new pair of leg warmers!


 She thought they were pretty awesome too!


They were so quick and easy--that I had to make a few more pairs.


I wonder if I'm too old for a pair?

Linking to THESE parties.


Related Posts with Thumbnails